
Why Laminate Flooring is a Vancouver Favorite
Laminate flooring’s affordability, scratch resistance, and realistic wood/stone looks make it ideal for Vancouver’s homes—from rainy North Shore basements to high-traffic Mount Pleasant kitchens. But with the city’s humidity and temperature swings, proper installation is key to prevent warping or gaps. Here’s how to decide between DIY and hiring a pro.
DIY Laminate Installation Guide for Vancouver Homes
Tools & Materials You’ll Need
Laminate Planks: Buy 10% extra (available at Flooring Superstores Vancouver).
Moisture-Resistant Underlayment: Essential for damp basements (try Quick Step Silent Walk).
Spacers: Maintain ¼” gaps for expansion in humid summers.
Tools: Circular saw, tapping block, rubber mallet.
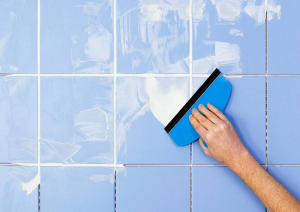
Step-by-Step Installation
Prep Subfloor: Level with self-leveling compound (common in older East Van homes).
Lay Underlayment: Overlap seams 8” and tape edges.
Start Layout: Parallel to the longest wall; stagger seams 8–12”.
Click-and-Lock Planks: Angle tongues into grooves; use spacers near walls.
Cut Around Obstacles: Use a jigsaw for vents or Heritage Home door frames.
Pros of DIY
Save 2–2–4/sq.ft on labor.
Flexible timeline (e.g., weekend projects in Kitsilano condos).
Cons of DIY
Risk of gaps or peaking from humidity changes.
Time-consuming (2–4 days for beginners).

Hiring a Pro in Vancouver: Costs & Benefits
Why Go Pro?
Warranty: 2–5 years on labor and materials (e.g., West Coast Flooring).
Speed: 500+ sq.ft installed daily with laser tools.
Complex Jobs: Stairs, uneven floors (common in Heritage Homes).
Cost Breakdown
Basic Labor: 2–2–4/sq.ft.
Extras: Subfloor prep (1–1–3/sq.ft), trim work, or debris removal.
How to Choose a Contractor
Check Google Reviews and HomeStars Vancouver ratings.
Verify BC Housing License (e.g., RainCity Floor Care).
Compare 3+ quotes (avg. Vancouver total: 4–4–8/sq.ft).

DIY vs. Pro: Vancouver Cost & Time Comparison
| Factor | DIY | Professional |
|---|---|---|
| Cost | 1.50–1.50–3.50/sq.ft (materials) | 4–4–8/sq.ft (all-in) |
| Time | 2–4 days | 1–2 days |
| Warranty | None | 2–5 years |
| Best For | Small, simple rooms | Large areas, luxury planks |
5 Common Mistakes to Avoid in Vancouver
- Ignoring Expansion Gaps: Humidity causes planks to swell—use spacers!
- Skipping Underlayment: Leads to moisture damage in Richmond basements.
- Poor Subfloor Prep: Uneven floors cause creaks (common in Fairview homes).
- Wrong Cutting Tools: Dull blades chip edges—rent a laminate cutter from Home Depot Vancouver.
- Mismatched Transitions: Use T-moldings between rooms for seamless looks.

Why Choose Quick-Step Laminate for Vancouver?
Waterproof Options: Impressive Ultra line handles rainy entryways.
Realistic Designs: Oak and slate looks perfect for Yaletown lofts.
Local Supplier: Available at Flooring Canada Vancouver.
FAQ: Laminate Flooring in Vancouver
Q: Can I install laminate over Vancouver’s existing floors?
A: Yes, if tile/vinyl is flat and secure. Add a moisture barrier underlayment.
Q: Best underlayment for damp basements?
A: Quick Step Silent Walk or DriCore R+ (sold at Rona Vancouver).
Q: How long does laminate last here?
A: 15–25 years with proper care. Avoid steam mops!

Conclusion: DIY or Hire a Pro?
For small, rectangular rooms (e.g., condos), DIY can save cash. But for large areas, luxury planks, or complex layouts, hire a Vancouver pro to avoid costly mistakes.
Need Help? Contact Saba Flooring for a free quote or visit our Burnaby showroom. Serving Metro Vancouver, Surrey, and Coquitlam!